AVD and Ansible Automation Platform
This guide will walk you through the steps required to get up and running with AVD and Red Hat’s Ansible Automation Platform (AAP). AAP is Red Hat’s solution to scale automation within an organization, whether by making automation more readily available to team members, adding security capabilities, or simplifying the speed of getting started with Ansible using execution environments.
Requirements to get started
- An accessible lab topology running Arista EOS.
- An AVD project or Git repository with playbooks and an inventory. To get started, you may also use any of our example topologies.
- A RHEL instance running AAP.
- If you need access to a RHEL instance, you can join the developer program to get a copy.
- To get started, you may also sign up for a 60-day trial license for AAP.
Note
This guide leverages AAP version 2.4. The workflows should be similar in newer versions. If there are any questions, please see the official AAP documentation. If you notice any errors in this guide, please open an issue.
Topology
Our topology leverages two spines and four leaf nodes to create a layer three leaf spine topology. The topology is managed by Arista CloudVision (CV). In our case, the EOS nodes are constantly streaming to CV and gives us the ability to provision the nodes with CV. AAP will act as our controller to communicate any updates to CV, which can then push the updates to our topology.

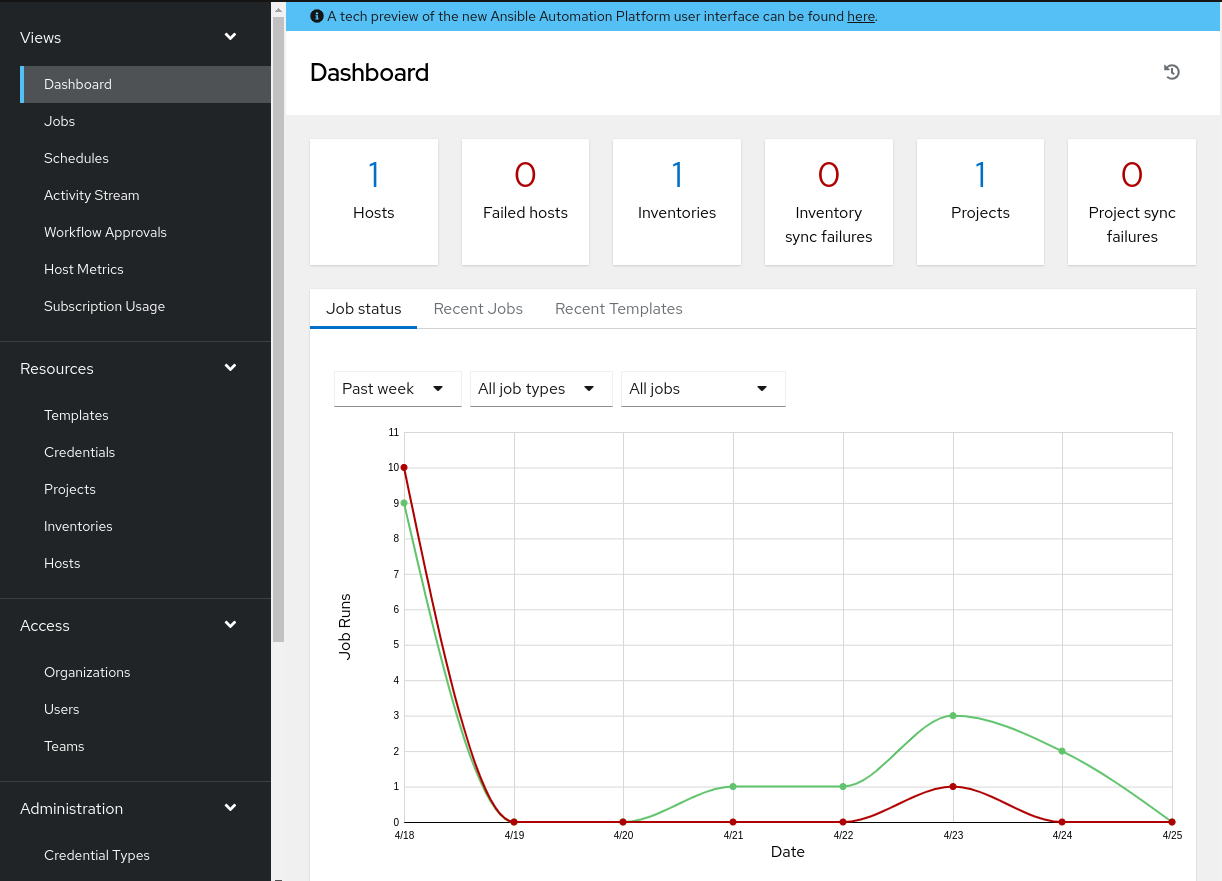
AAP Dashboard
The image below provides an excellent overview of the AAP dashboard. From one pane, we have quick links to hosts, inventories, and breakdowns of recent job executions. The left pane provides us access to anything we may need within AAP. This guide will go through setting up the following items:
- Execution environments
- Projects
- Inventories
- Job templates
- Surveys
Execution environments with Ansible Builder
Execution environments (EEs) are Red Hat’s solution for managing project dependencies. In the past, we used Python virtual environments. The Python virtual environments had pros and cons, but EEs leverage containers to wrap all dependencies within a container. EEs make environments more portable and quicker to replicate between AAP nodes and standalone projects. We will go through an EE build together but it is highly recommended to build your own for your specific requirements.
Ansible Builder
Ansible Builder is a tool developed by the Ansible team to aid in creating EEs. Like any tool, there are a few requirements to get started with Ansible Builder.
- A development machine with Python installed.
- Ansible builder installed with
pip install ansible-builder. - Podman installed on the development machine.
You can place the Ansible builder dependencies with your current project or leverage a separate project entirely for your EE builds. Please note that this example was created with version 4.9.0 of the AVD collection. Dependencies may change between versions.
---
version: 3 #(1)

images: #(2)
  base_image:
    name: registry.fedoraproject.org/fedora:40

dependencies: #(3)
  python_interpreter:
    package_system: python311
    python_path: /usr/bin/python3.11

  ansible_core: #(4)
    package_pip: ansible-core<2.17.0

  ansible_runner: #(5)
    package_pip: ansible-runner

  galaxy: requirements.yml #(6)

  python: requirements.txt #(7)
- We are leveraging Ansible Builder 3.x, which requires version 3 of the definition file. If you leverage an older version of Ansible Builder, you may need to use
version: 1. - You may use any base container image. Please see the official documentation for more examples.
- Specifying what version of Python we would like installed during the container build.
- The version of ansible-core you need will greatly depend on your specific workflows.
- The
ansible-runnerpackage is required when building an EE. - This is a pointer to any additional collections we want installed on our container.
- This is a pointer to any additional Python packages we require for our workflow.
- Installing the
arista.avdcollection for this workflow will ensure that any other required collections are also installed.
The Python dependencies listed here are from the collection installation instructions. Please update the requirements for the specific version of the arista.avd collection you are leveraging.
Build the image
The command below will use Ansible Builder to start building our custom EE. In this case, we leverage Podman as a container runtime and tag the image appropriately.
Once complete, you can push the image to a public or private container registry.
Note
This guide uses Docker Hub as the container registry, but you may use any container registry that is accessible by AAP.
Execution environments on AAP
Once the image is located on our container registry, we are ready to add our custom EE to AAP.
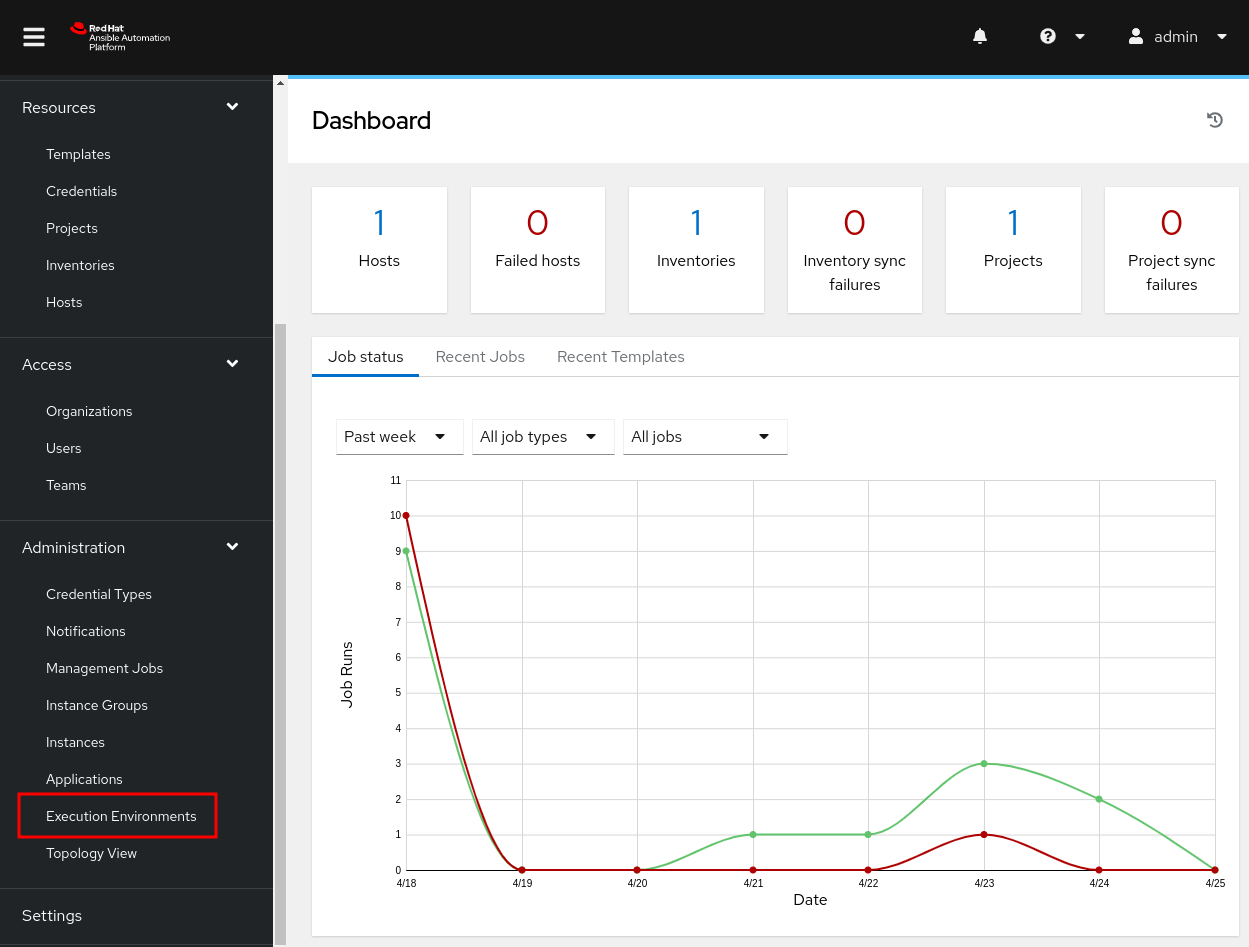
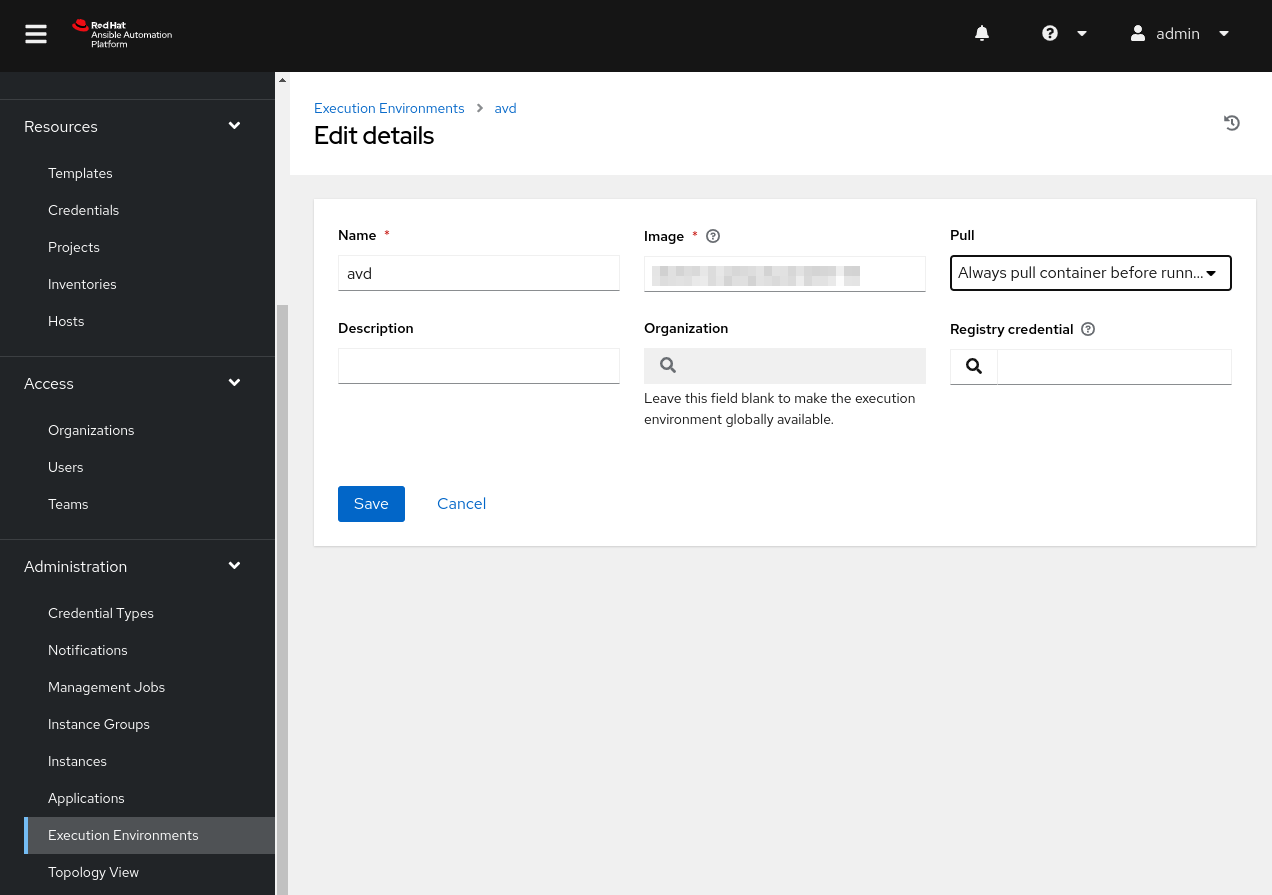
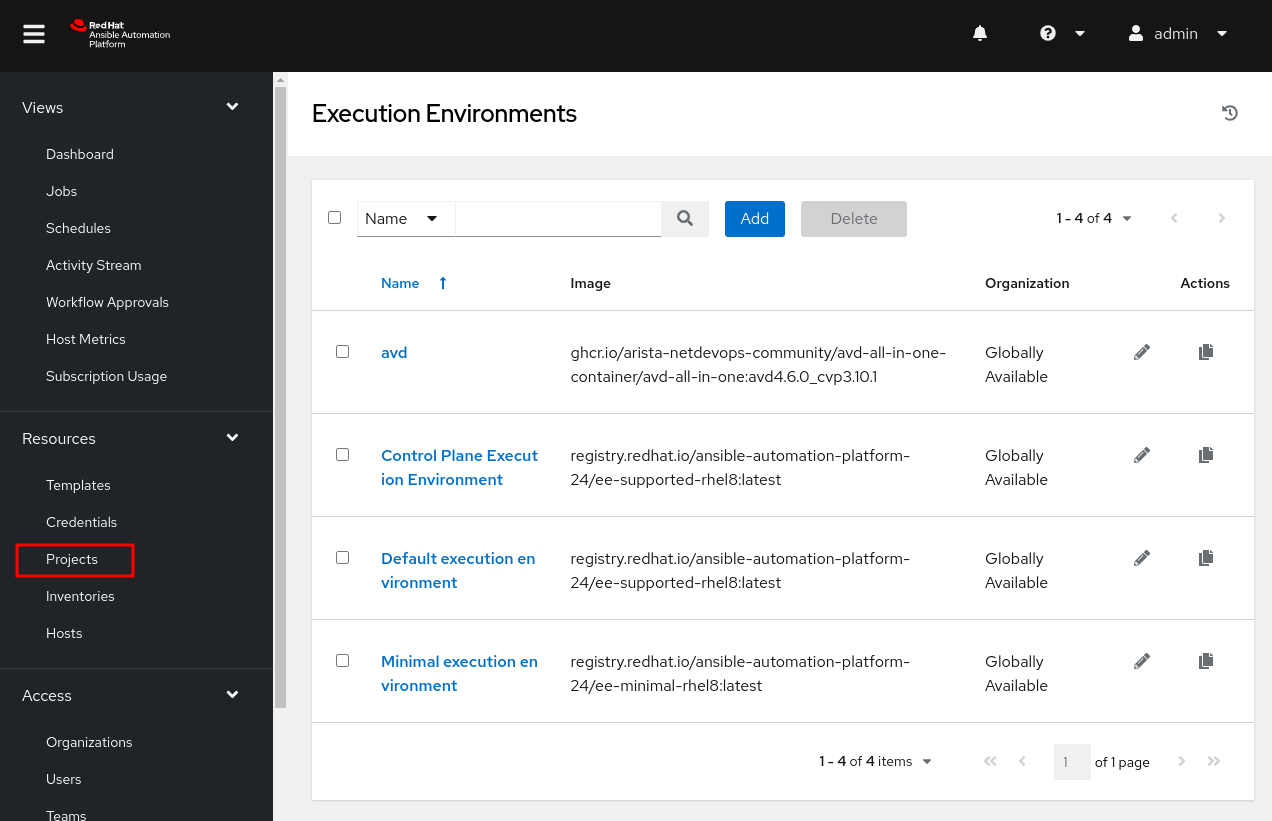
Scroll down on the left pane, and under Administration, click on Execution Environments.
In the new pane, click on Add. You can also see the built-in EEs installed with AAP.
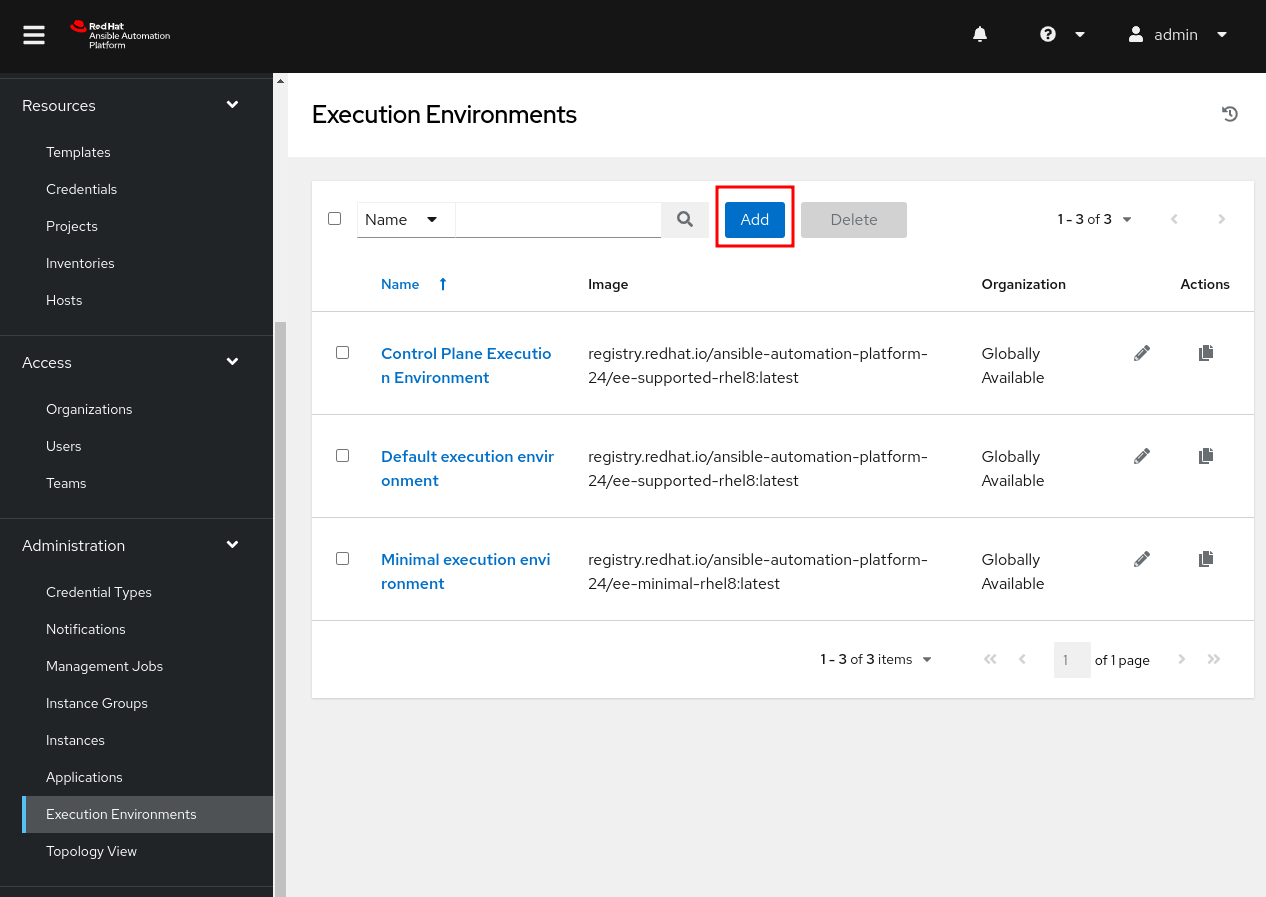
Give the EE an appropriate Name and full Image location. For the Pull option, this will vary if the EE is in active development and frequent changes are expected. Since our EE is in development, we will set this to Always pull container before running.
Projects
Projects in AAP are vital in setting up additional options. For example, we can leverage our project when defining a new inventory or reference playbooks within the project to define job workflows in AAP.
Scroll up on the left pane, and under Resources, click on Projects.
In the new pane, click on Add.
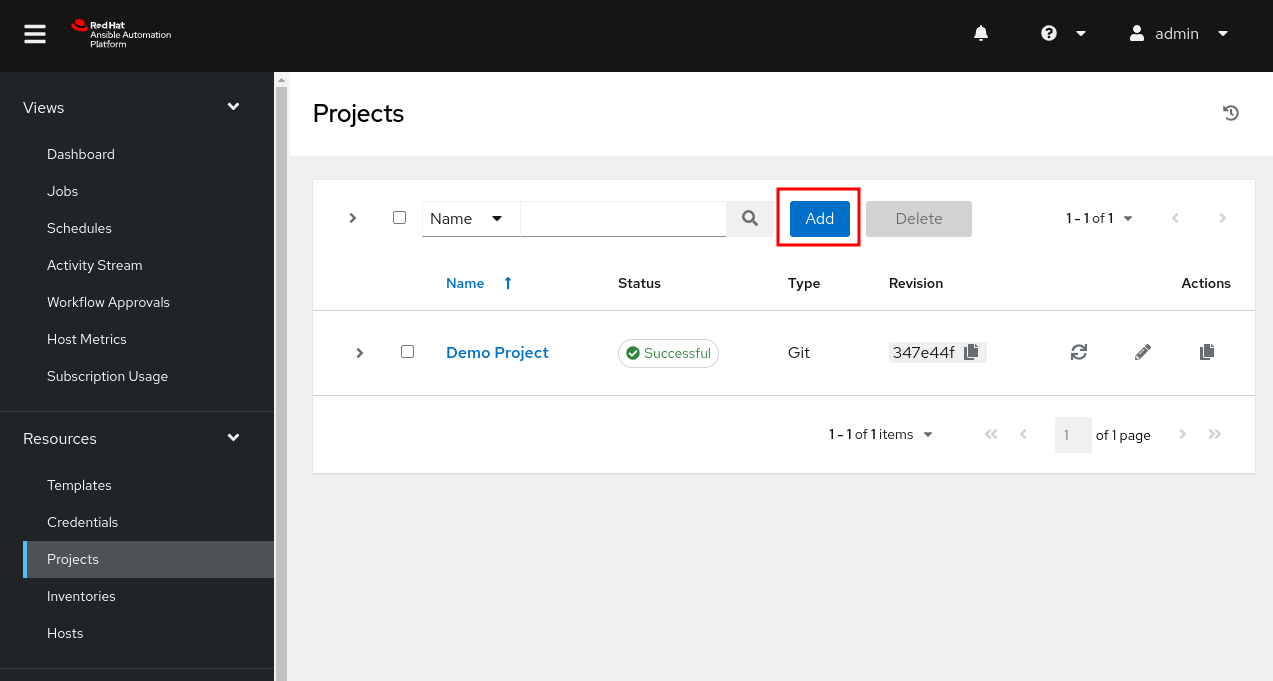
Give the project an appropriate Name. Again, you may use any examples hosted within the AVD repository or any current project you have. This example will leverage a Git repository as the Source Control Type. We will also set the URL for our Git project and, optionally, an alternate branch. Finally, we also check Update Revision on Launch and set the Cache Timeout to zero. Setting it to zero will also ensure the project updates when running a job that references this project, which is helpful for any projects with active development.

Inventories
AAP provides many ways to add an inventory. For example, we can use an inventory hosted within our project or constructed inventories made from multiple inventories. This example will leverage one inventory from our Git project.
On the left pane, and under Resources, click on Inventories.
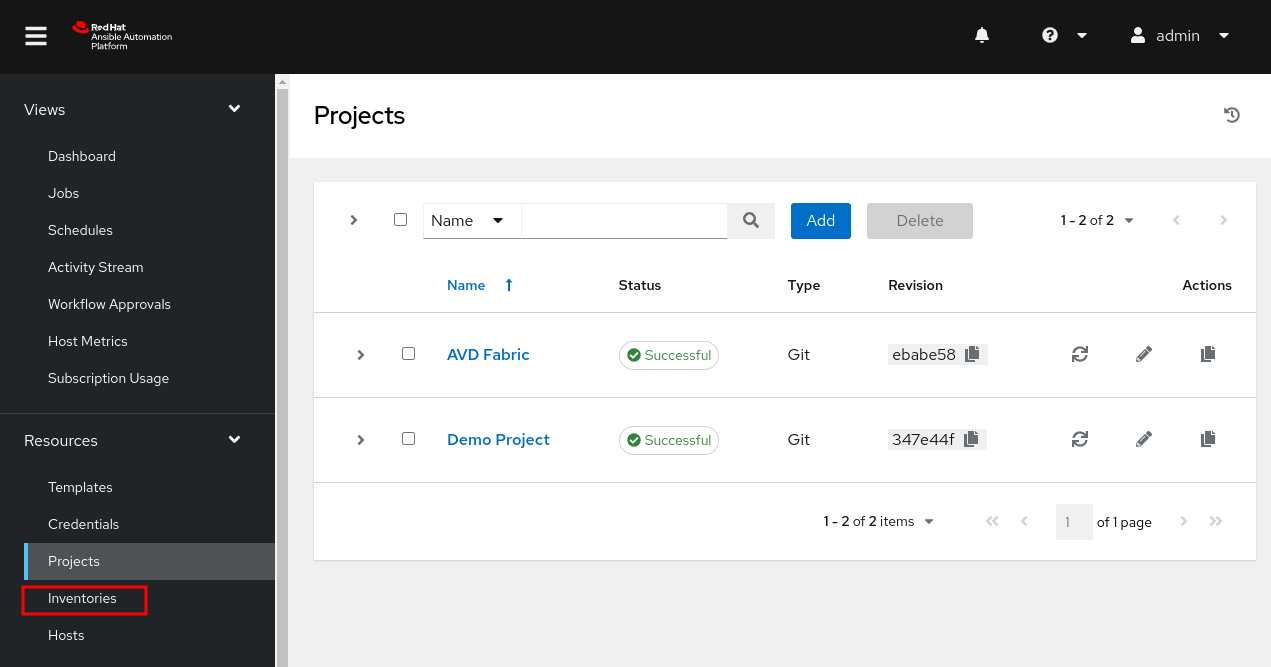
In the new pane, click on Add and select Add inventory.
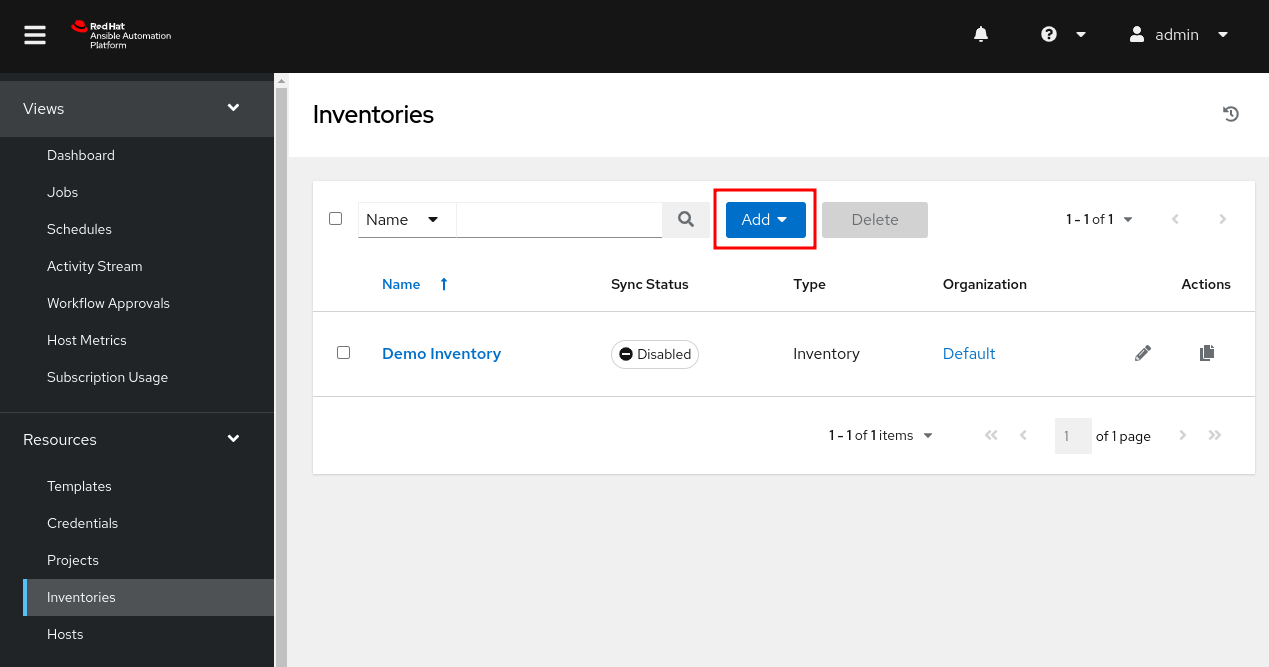
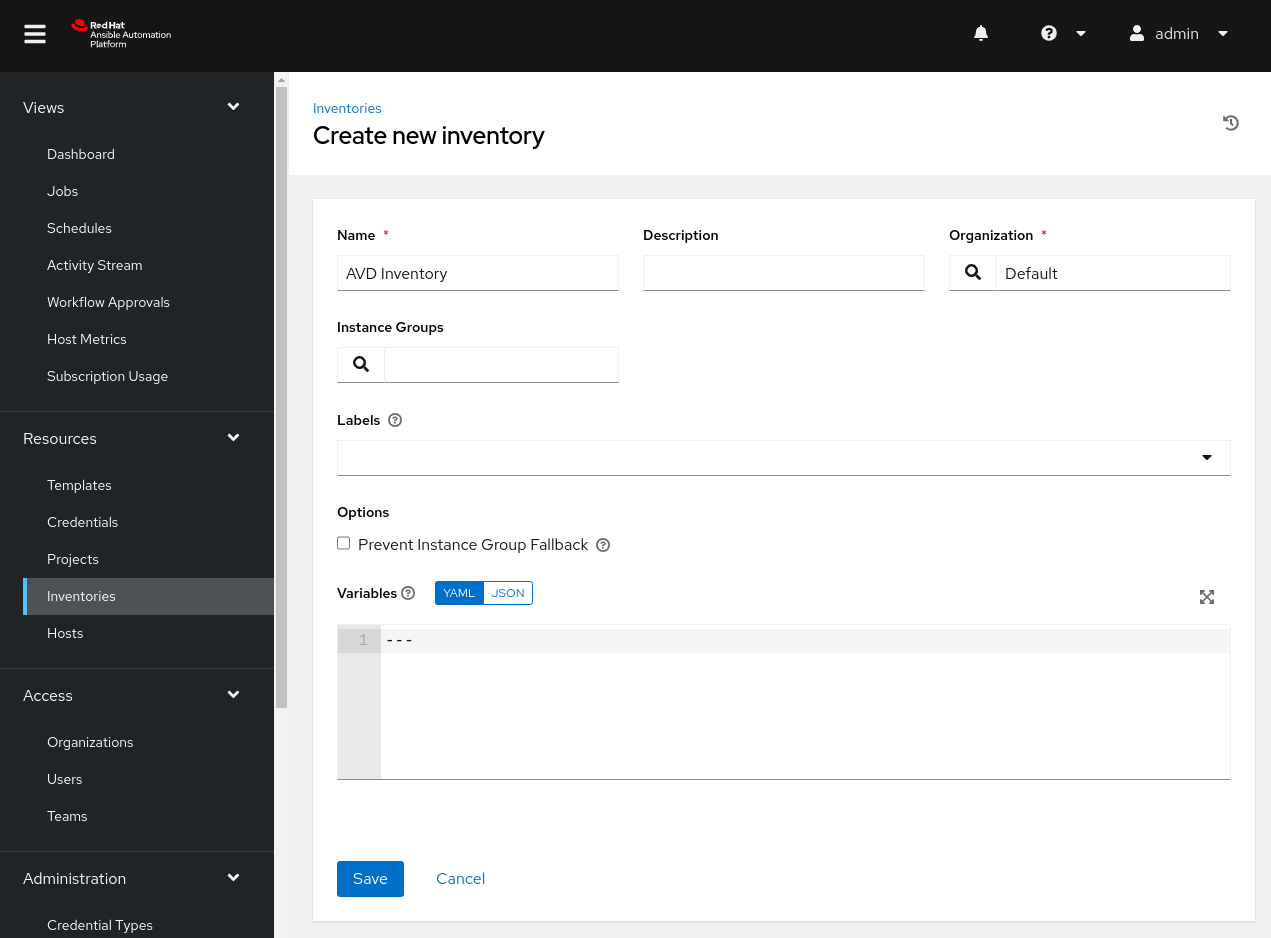
Give the inventory an appropriate Name and click Save.
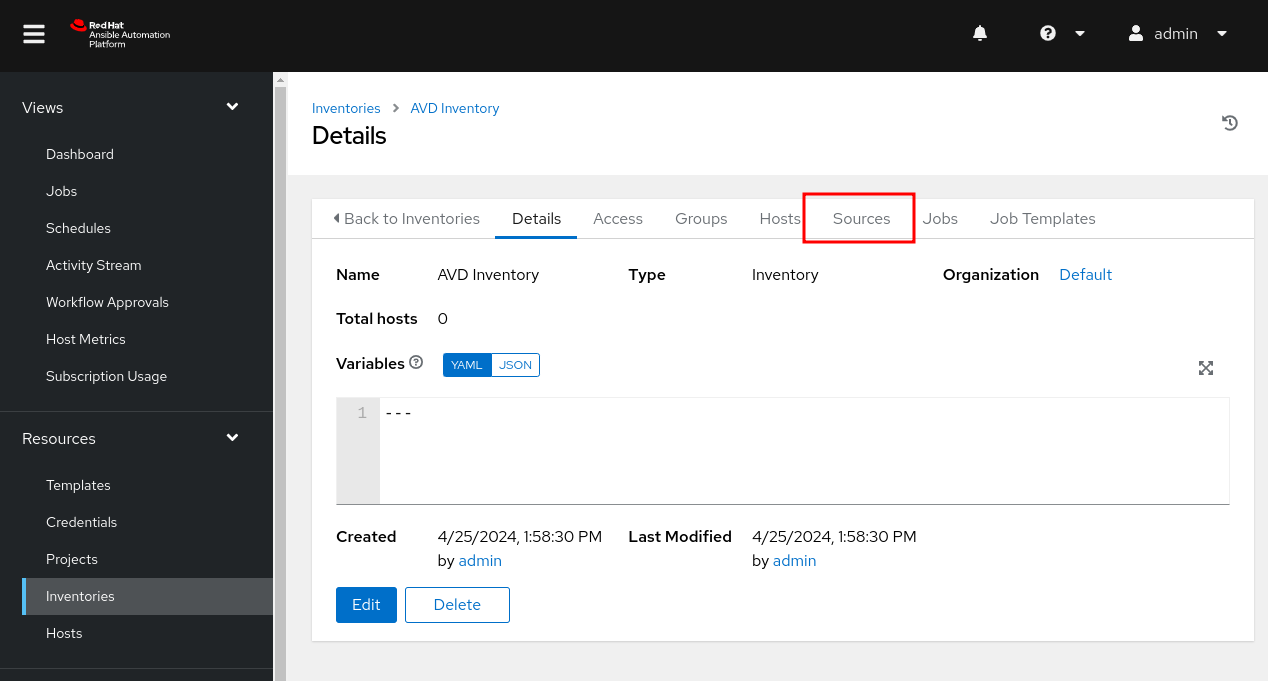
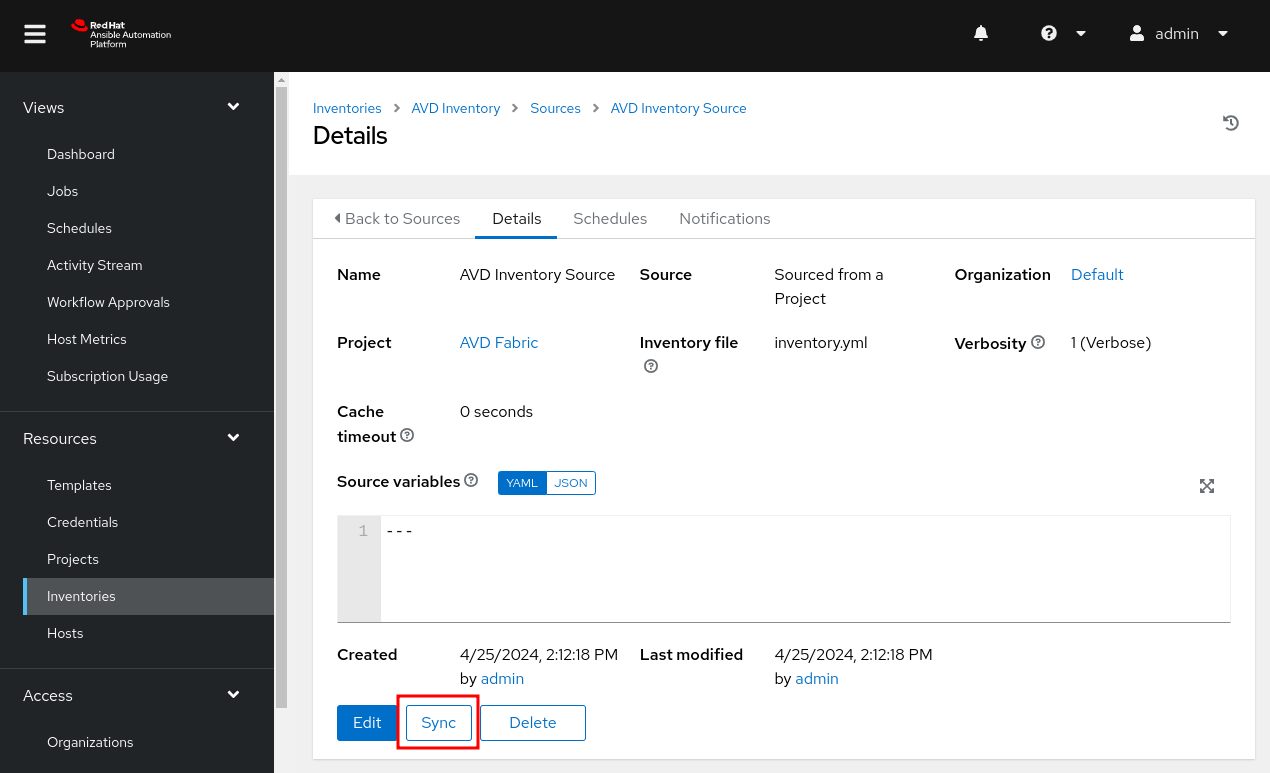
Inventory Sources
At this point, we have an inventory with no hosts. This is where inventory sources come into play. Like most things, we have a series of options. We can leverage an inventory source from Cloud providers, virtualization platforms, or, in our case, directly from our project.
On the center pane, click on Sources.
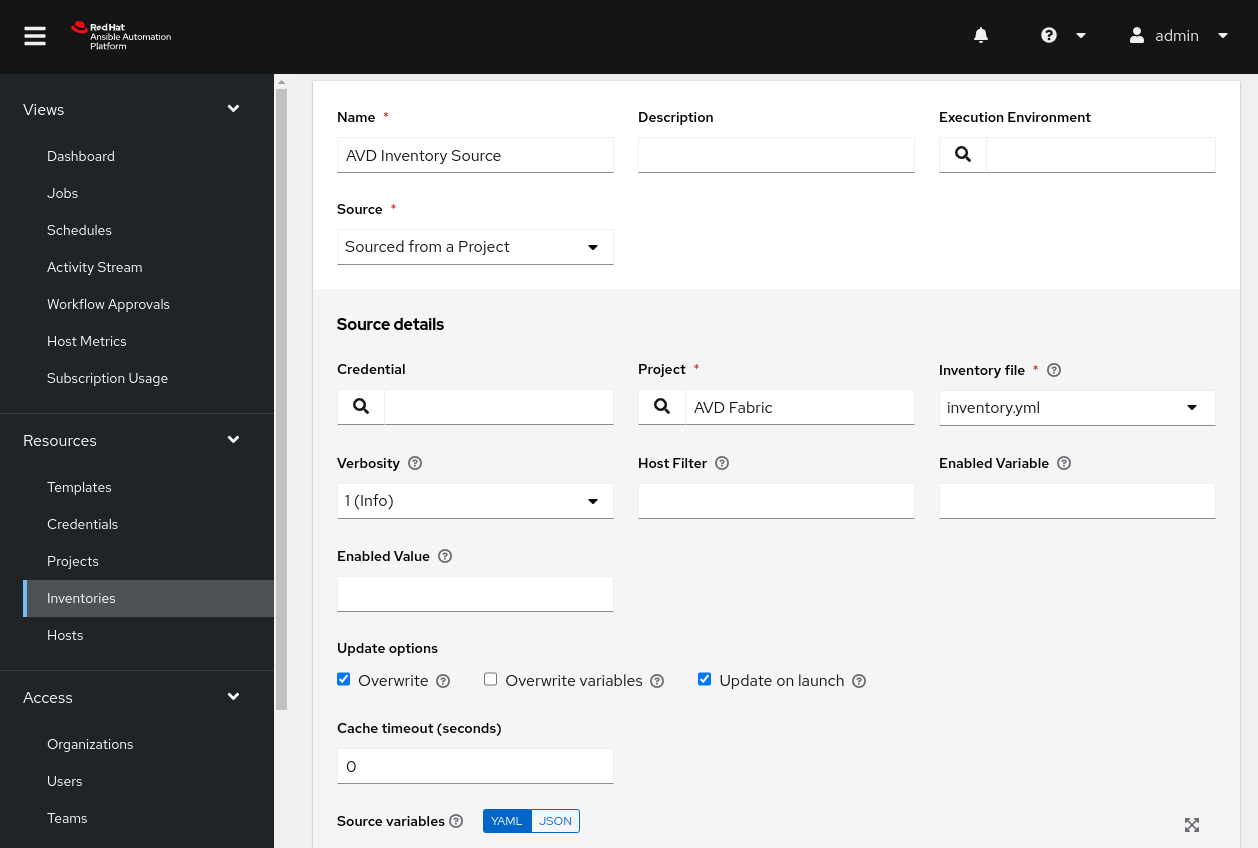
- In the new pane, click on
Add. - A new pane is shown but similar to before, fill in an appropriate
Nameand selectSource from a Projectundersource. - Under
Source detailsclick on the search icon underProject- Select your newly created project
- Under
Source details, if theInventory filedrop-down does not show your inventory, feel free to enter it manually. - Under
Update options:Overwriteis checked. Overwrite will ensure our inventory source manages additions and removal of hosts and groups.Update on launchis checked.
- Scroll down and click
Save.
In the new pane, click on Sync to update your inventory.
View the Inventory
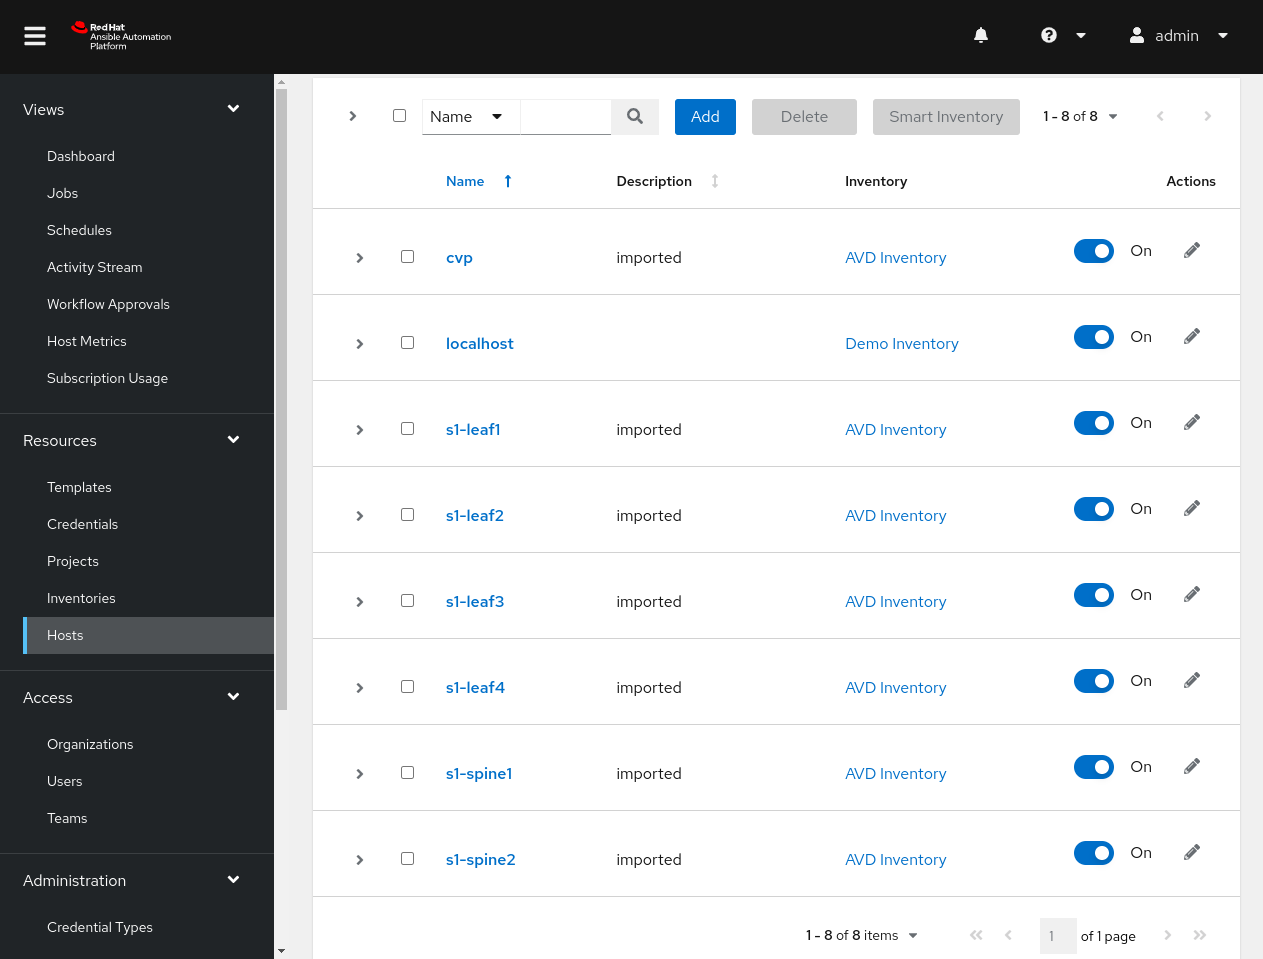
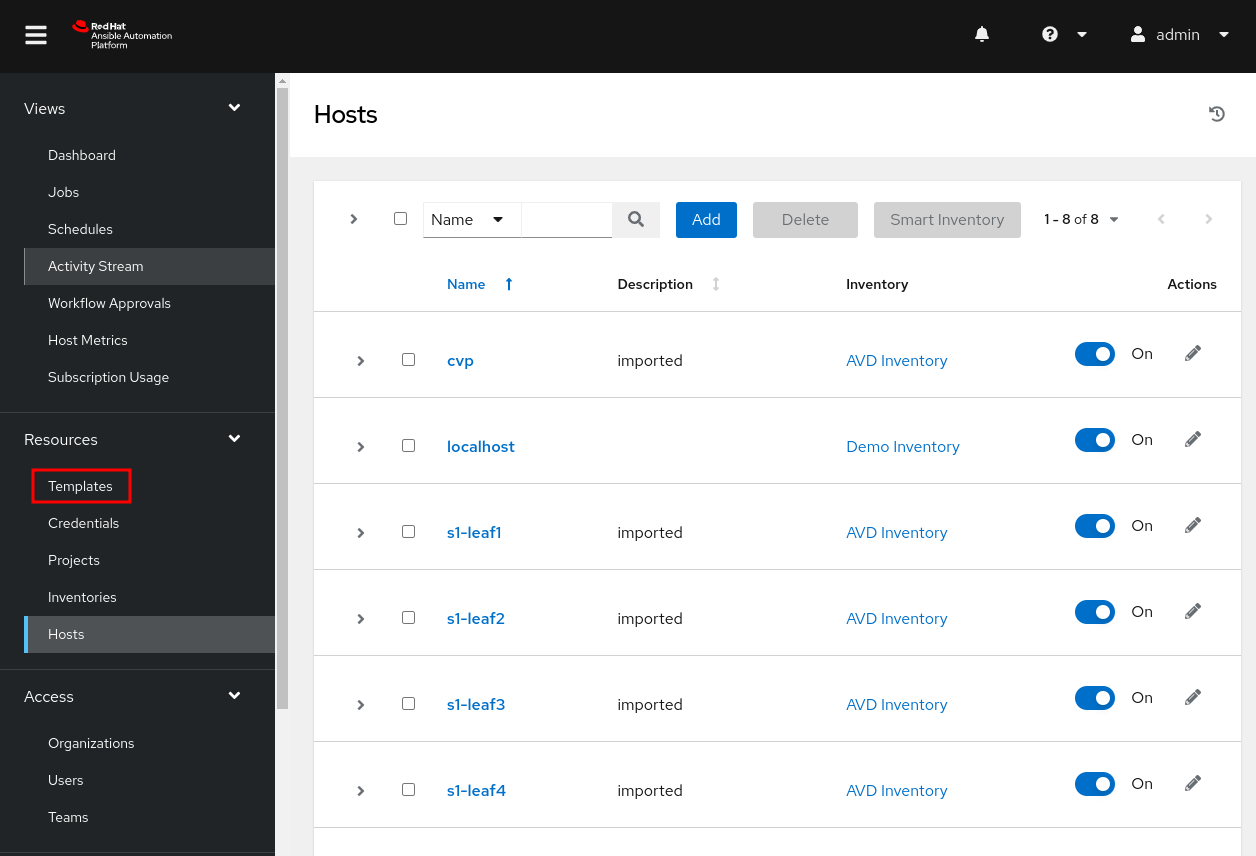
There are a few locations to view the inventory, but for simplicity, we can view it by clicking on Hosts on the left pane.
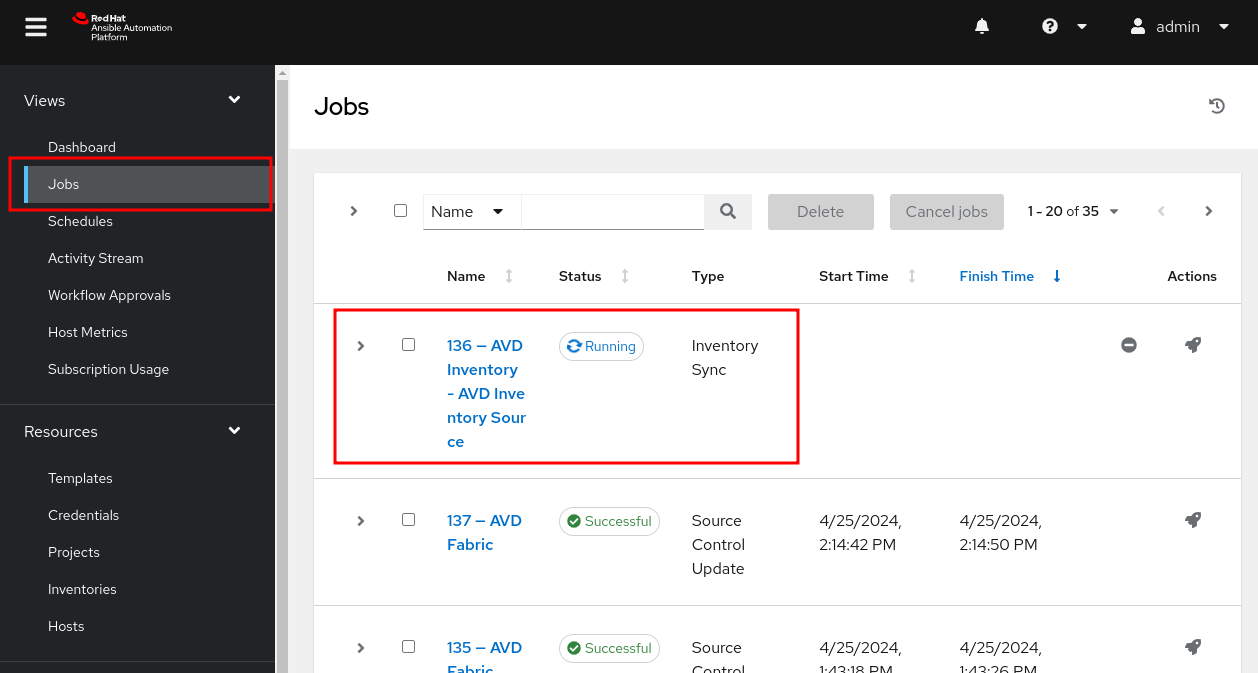
- On the left pane, click on
Jobs.- You should see an inventory sync running or complete.
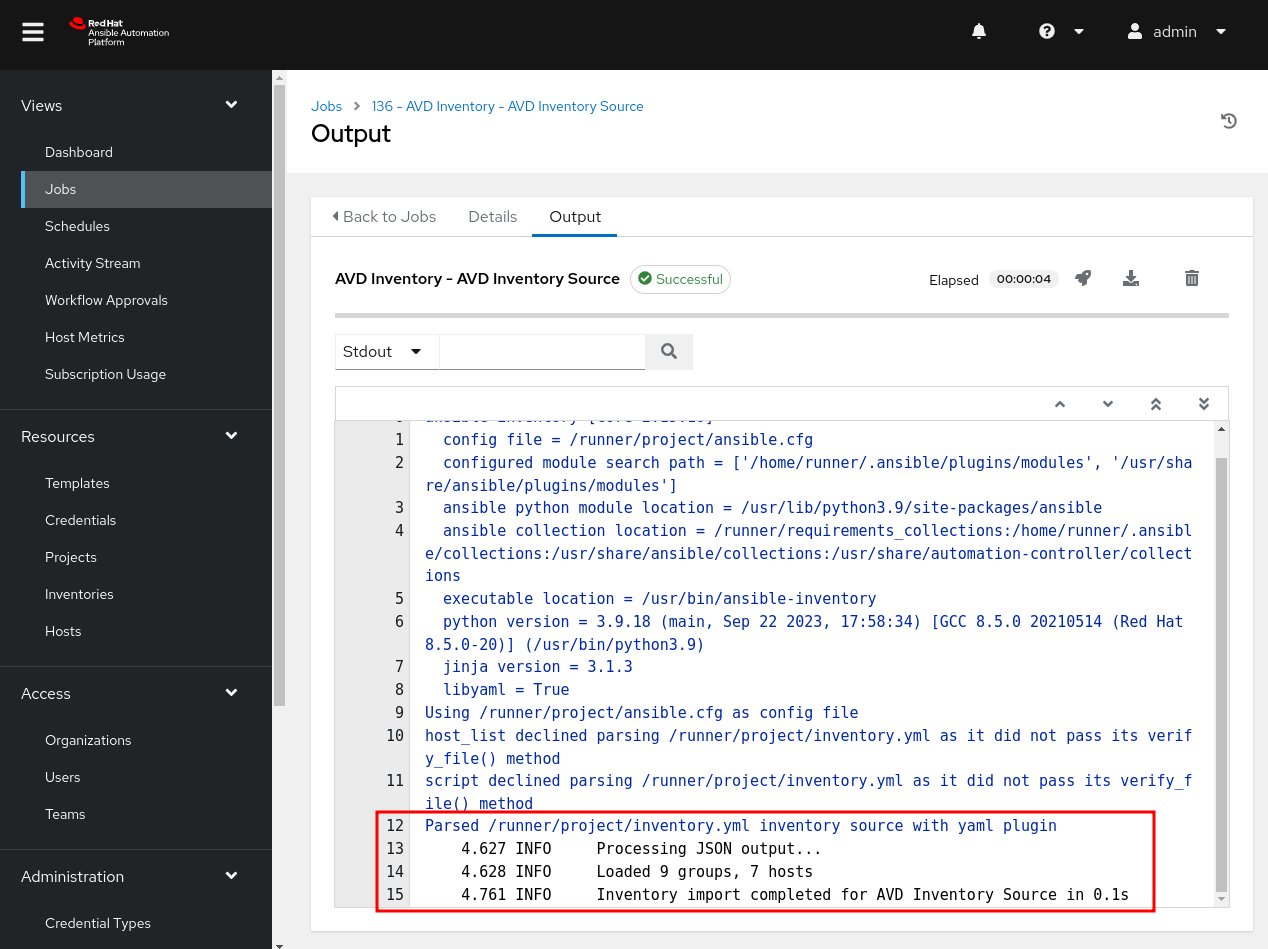
- Click on the inventory sync job.
Towards the bottom of the output, we see that AAP successfully parsed our inventory. In this case, we have loaded nine groups and seven hosts.
There are a few locations to view the inventory, but for simplicity, we can take a look by clicking on Hosts on the left pane.
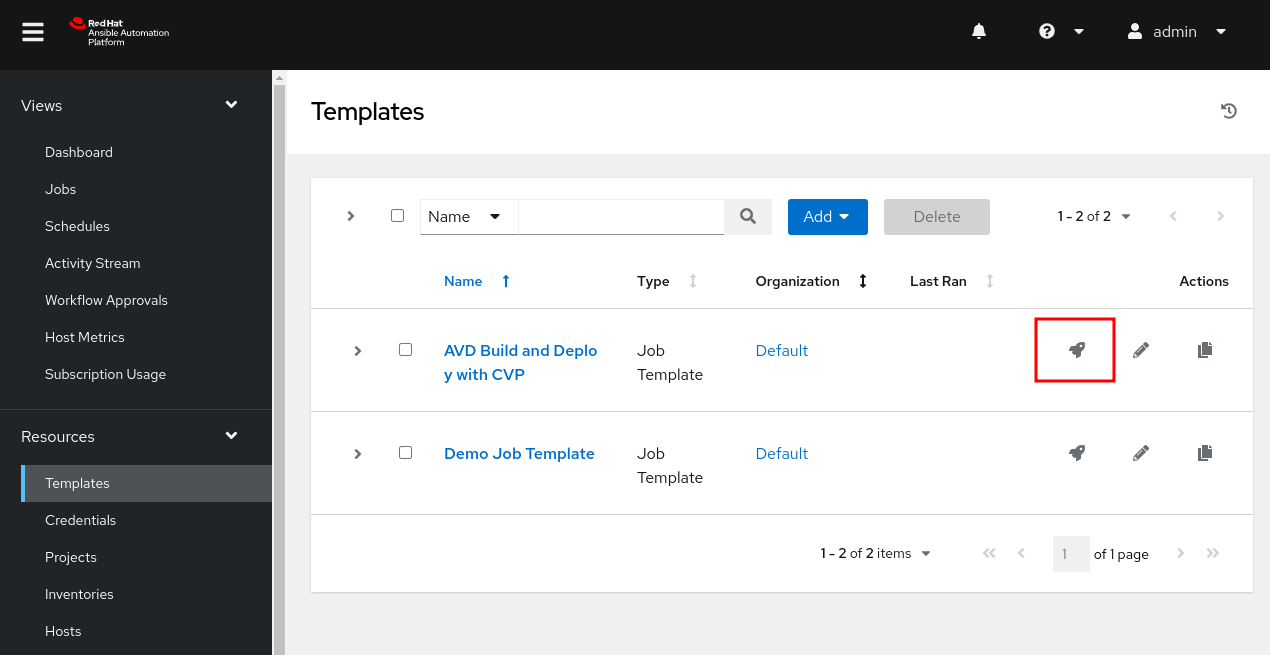
Job templates and workflow templates
One thing that may need some clarification is the naming of “job templates.” These map to playbooks within our project. There is also an option to build workflow templates: a series of job templates with some control logic built-in. For this example, we will use a job template to build and deploy our node configurations with CV.
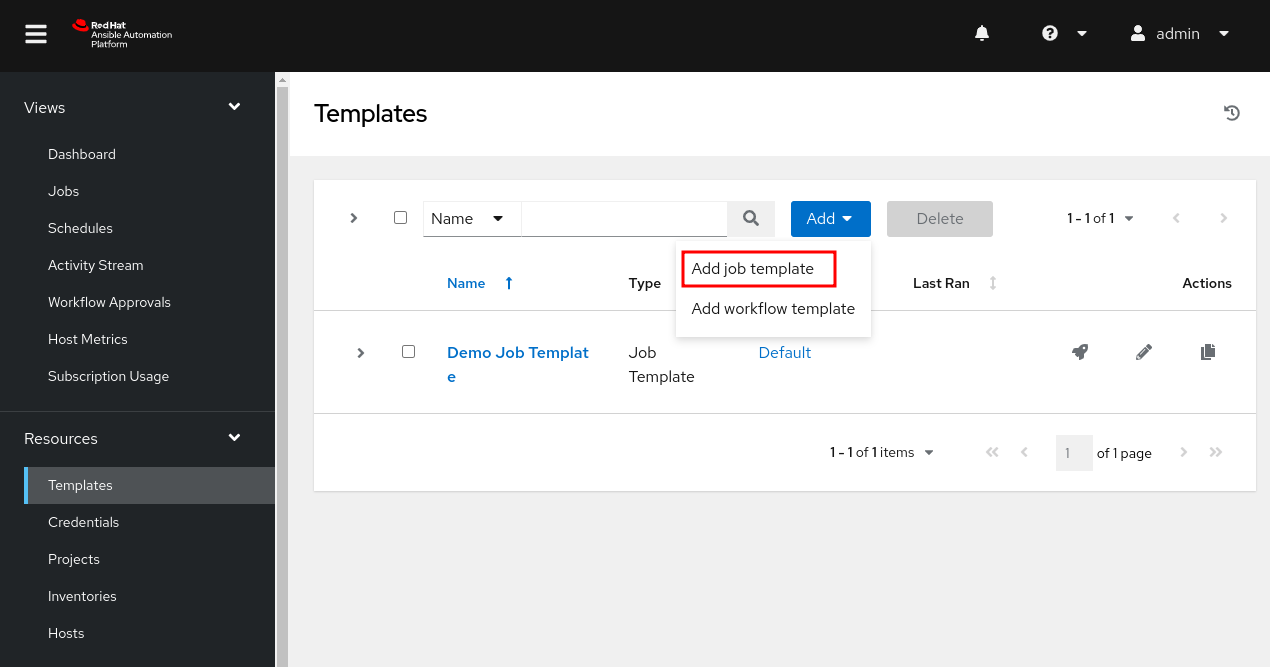
On the left pane, click on Templates.
- On the center pane, select
Add. - In the drop down select
Add job template.
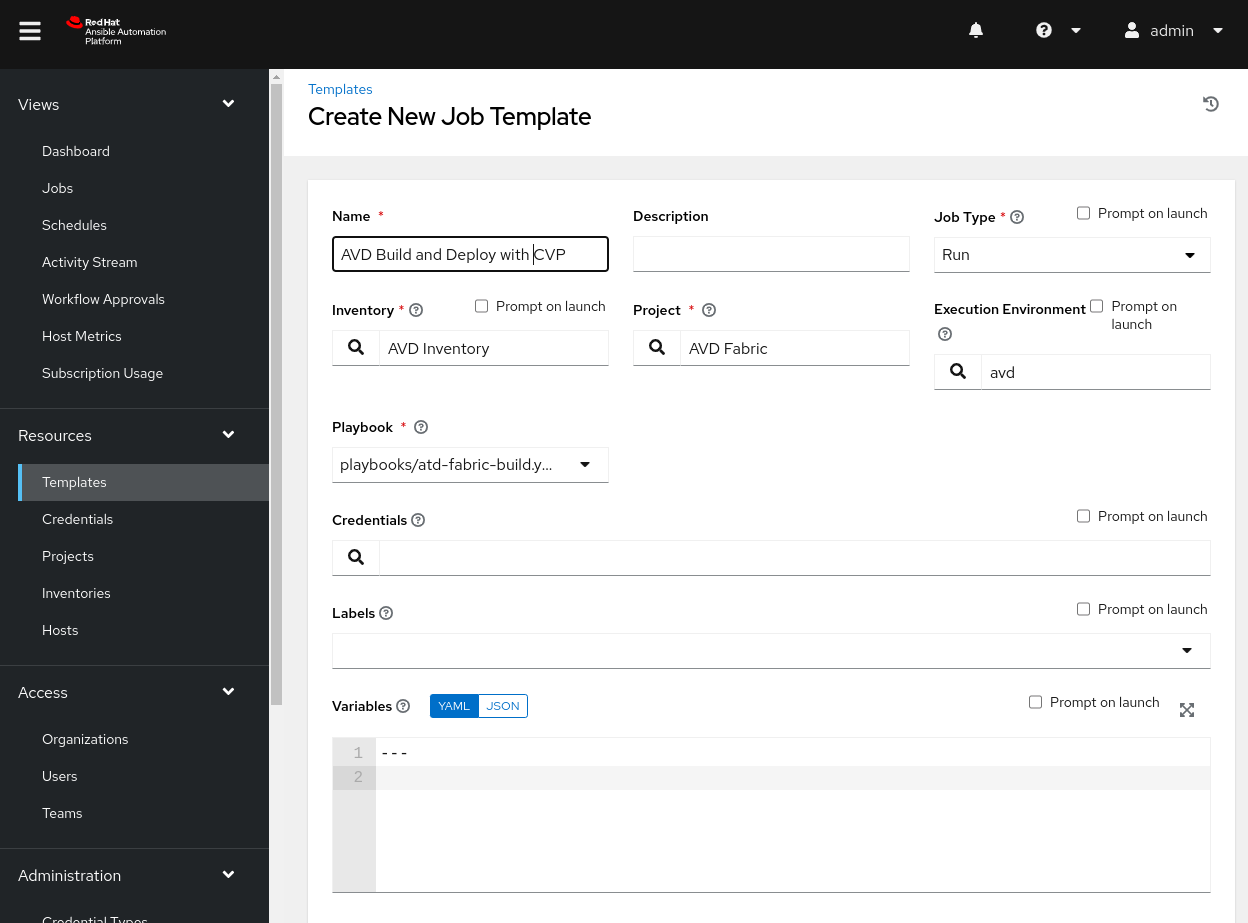
The job template is where we leverage the custom execution environment. Since our setup requires specific Ansible collections and Python packages installed, we would like to use a pre-packaged environment with that software. We can modify a decent number of settings, and they may look familiar from previous history with Ansible configurations. If you need a refresher on these options, please see the official documentation. Once you are happy with the settings, click Save.
Warning
The playbook is set to “Run,” and the EOS instances in use will be changed. Please ensure you are leveraging nonproduction instances when testing.
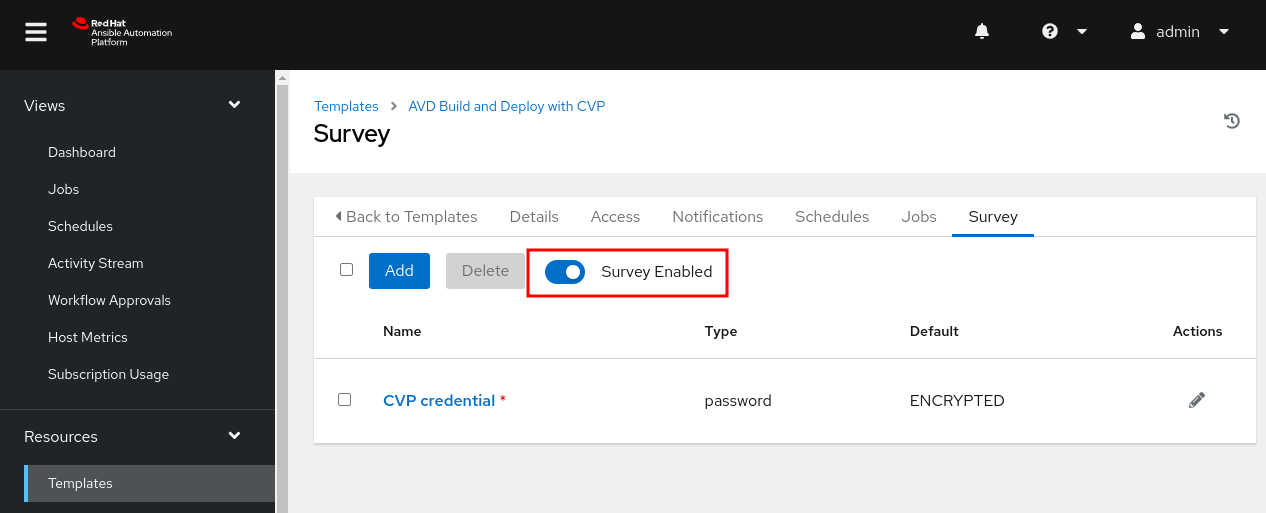
Surveys
With most jobs, we need a way to authenticate to our CV instance or EOS nodes. AAP provides a multitude of ways to define credentials. Some options are credentials for Network devices, Container registries, HashiCorp Vault, etc. Feel free to explore any option you need for your environment. For this guide, we will leverage a survey secret. Surveys allow us to ask users for information we require for a job to execute correctly. We will leverage a survey with a default secret value (this is the credential used to connect to our nodes).
Note
You will need to create a service account and token in CloudVision for the survey.
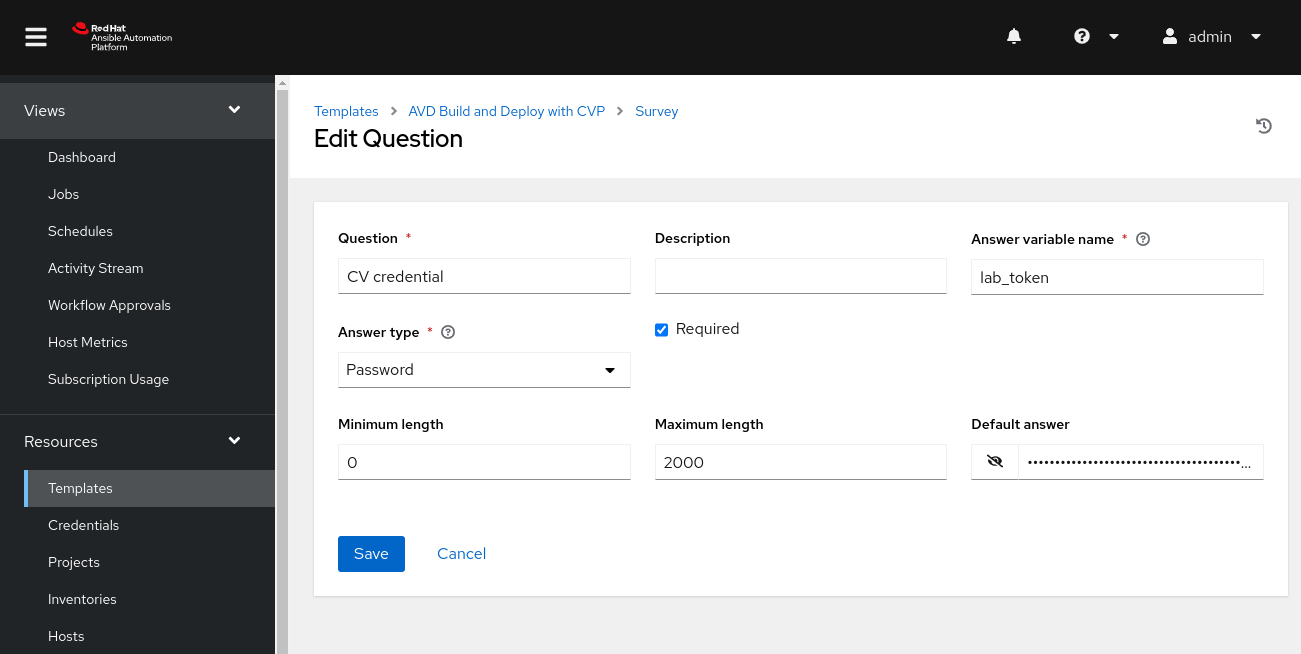
On the center pane, click on Survey.

- On the center pane, select
Add. - Set
Questionto an appropriate value. - Set
Answer variable nameto any valid variable name, here we uselab_token. Answer typeis set toPasswordand the default value is set.- Set
Maximum lengthto 2000 to fit the Service account token for CV provisioning. - Enter your
Default answer. - Click
Savewhen done.
The lab_token variable will be leveraged when provisioning the fabric with the cv_deploy role.
tasks:
  - name: Provision CV with AVD configuration
    import_role:
      name: cv_deploy
    vars:
      cv_server: <CV or CVaaS URL>
      cv_token: "{{ lab_token }}"
      cv_run_change_control: true
Note
This guide leverages the cv_deploy role for provisioning through CV. The cv_deploy role requires additional options and tokens to be generated. Please see the cv_deploy role documentation for the most up-to-date settings. We also set cv_change_control to true, the default it false. This allows the change control to be executed automatically.
Click the Surveys Disabled radio button to ensure the survey is enabled.
Running the Template with CV
Below is an example of the playbook we are leveraging to build and deploy our configurations with CV.
---
- name: Manage Arista EOS EVPN/VXLAN Configuration
  hosts: ATD_FABRIC
  connection: local
  gather_facts: false
  collections:
    - arista.avd
  vars:
    fabric_dir_name: "{{ fabric_name }}"
  tasks:

    - name: Generate intended variables
      import_role:
        name: eos_designs

    - name: Generate device intended config and documentation
      import_role:
        name: eos_cli_config_gen

    - name: Provision nodes with CV
      import_role:
        name: cv_deploy
      vars:
        cv_server: <CV or CVaaS URL>
        cv_token: "{{ lab_token }}"
        cv_run_change_control: true
We have everything we need to run our job template now.
Note
This guide leverages the cv_deploy role for provisioning through CV. The cv_deploy role requires additional options and tokens to be generated. Please see the cv_deploy role documentation for the most up-to-date settings. We also set cv_change_control to true, the default it false. This allows the change control to be executed automatically.
- On the left pane, click on
Templates. - Click on the
Launch Templateicon to run the job template. - In the new pane, click
Next. - In the
Launchpane, clickLaunch.
On the left pane, select Jobs. You may see a series of updates. For example, our source control is updating because our timeout is set to zero. The inventory has also been updating since we checked Update on launch. Last but not least, the job template will run.
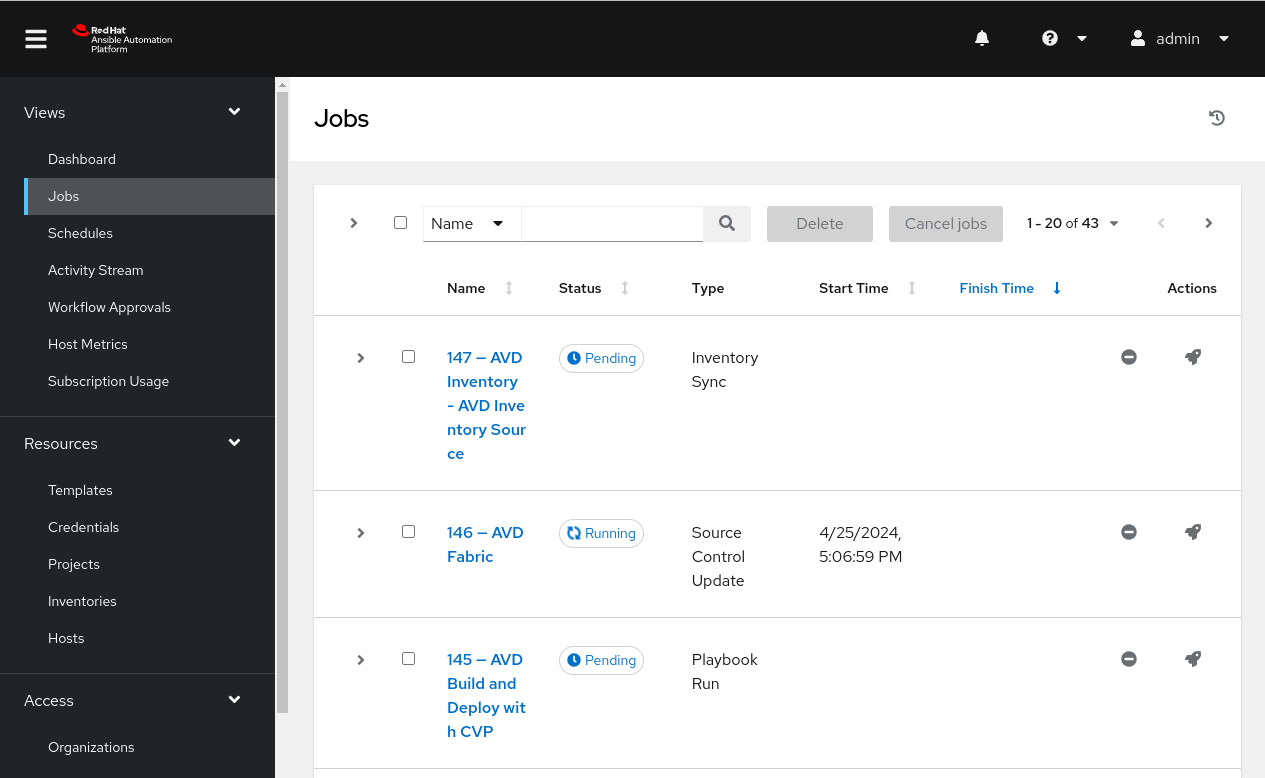
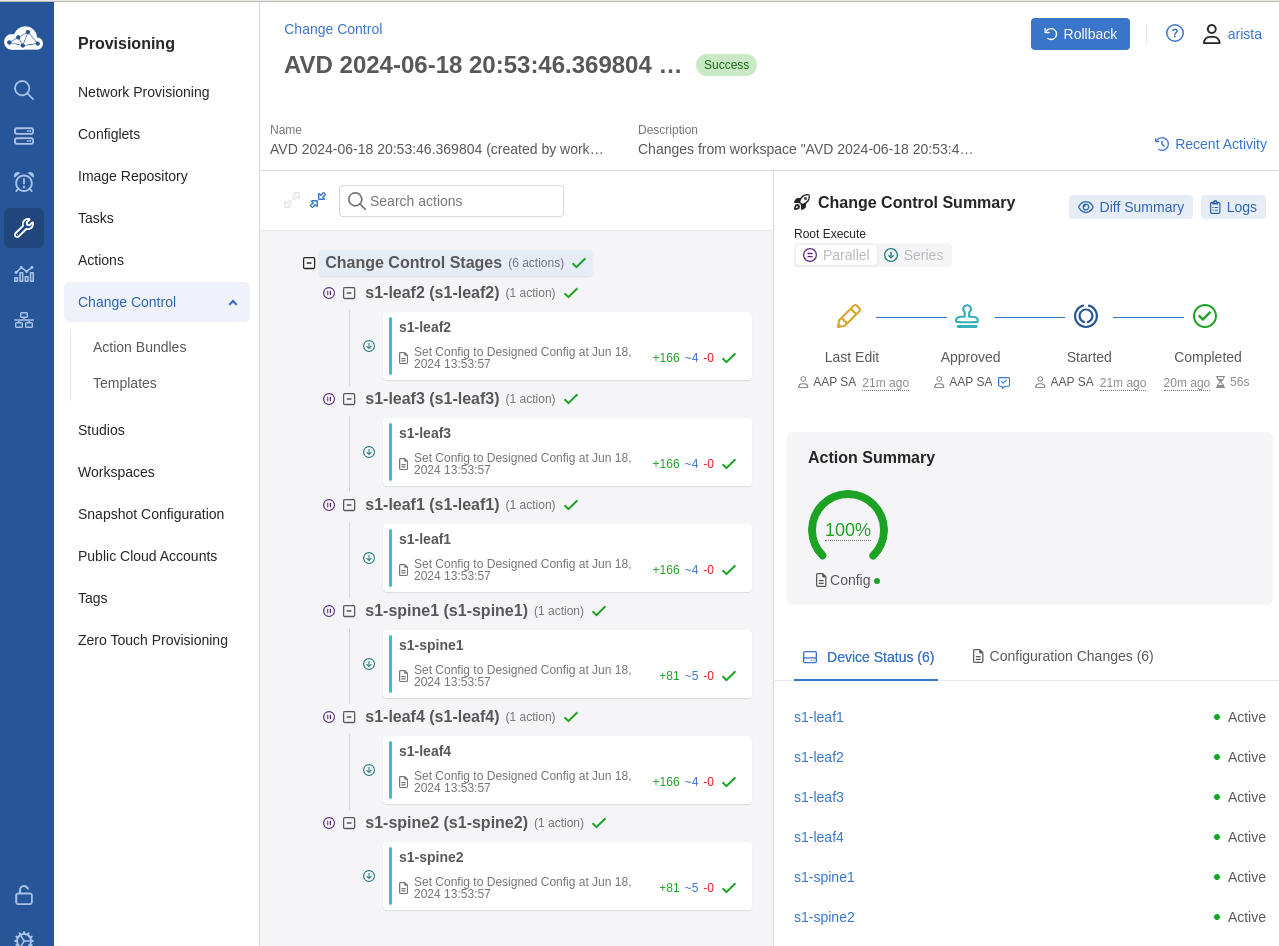
We can now click on the job run and see a successful execution.
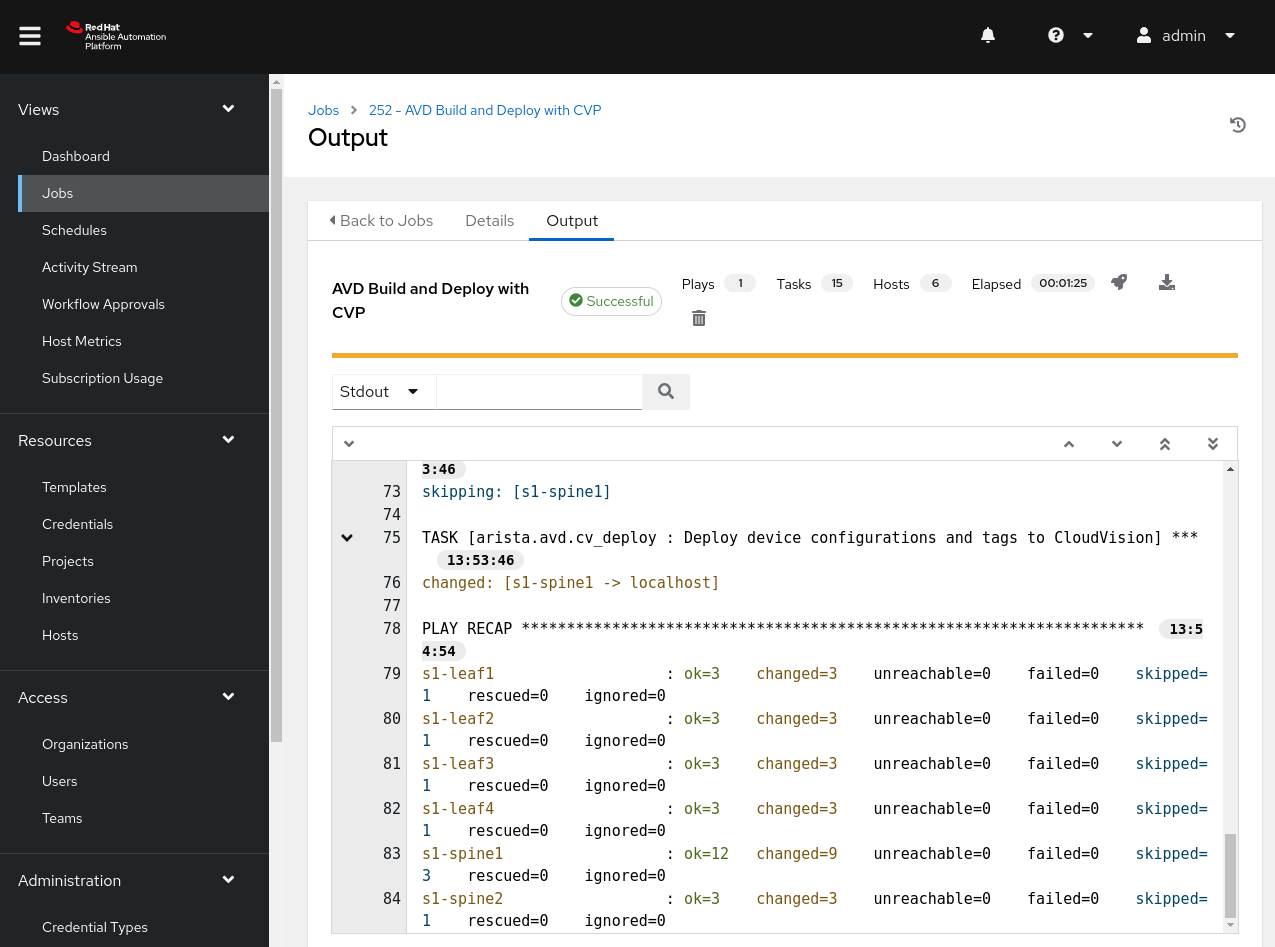
From CV’s perspective, we can see our change control workflow has been completed for us when leveraging the cv_deploy role.